Communicating with the database using SQL
Learning Objectives
Use the tables and data from your CYF_hotel database. If you need to start from a clean state for your database, run psql -d CYF_hotel -f build_hotel.sql.
Earlier, we created a new NodeJS project called CYF-hotels-api with a single API endpoint /customers to get the list of all customers. Now, we will add other endpoints with more functionalities to interact with the CYF_hotel database.
You should have a server.js file that looks something like this:
const express = require("express");
const app = express();
const { Pool } = require("pg");

const db = new Pool({
  user: "keith",
  host: "localhost",
  database: "CYF_hotel",
  password: "",
  port: 5432,
});

app.get("/customers", function (req, res) {
  db.query("SELECT * FROM customers")
    .then((result) => {
      res.status(200).json({ customers: result.rows });
    })
    .catch((err) => {
      console.log(err);
    });
});

app.listen(3000, function () {
  console.log("Server is listening on port 3000. Ready to accept requests!");
});
Before we move on, run the server.js file in node and check the endpoint using your browser.
Using Postman to Test an API
You should have Postman already installed on your system. If not then please install it now.
Run Postman (it can be slow to start).
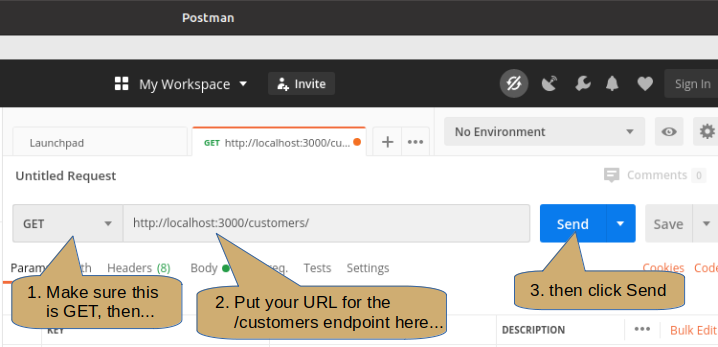
Check the method is GET, set the URL for your customers endpoint then click Send.

Being More Selective
Learning Objectives
Returning all the customers is fine for a small table (even the 130+ customers) but if we have a large number of rows, thousands or millions, then that approach is very clumsy.
If we know the value of the id column for the customer we can retrieve just that one row (we know there is only one row because id is the Primary Key).
Create a new endpoint to get the customer by using the id value:
app.get("/customers/:id", function (req, res) {
  // TODO - add code here
});
Here the endpoint includes :id, which identifies an extra parameter in the URL that will provide the id value, as in http://localhost:3000/customers/3. We just need a way to get the value from the URL.
Express provides a simple way to get such parameters from the request:
const custId = parseInt(req.params.id);
Note that the id in req.params.id must match the name after the colon in the endpoint "customers/:id".
Next we need to query the customers table and provide the value of the id into a WHERE clause so that we retrieve only the one row that matches:
db.query("SELECT * FROM customers WHERE id = $1", [custId])
  .then((result) => {
    console.log(result);
  })
  .catch((err) => {
    console.log(err);
  });
In the above code notice that:
- The
SELECTnow uses aWHEREclause - The value we are wanting to look for appears as
$1- this is a placeholder for the ‘id’ value - The second parameter is the array
[custId]that provides the id value
Let’s complete the endpoint to return the retrieved values:
app.get("/customers/:id", function (req, res) {
  const custId = parseInt(req.params.id);
  db.query("SELECT * FROM customers WHERE id = $1", [custId])
    .then((result) => {
      console.log(result.rows);
    })
    .catch((error) => {
      console.log(error);
    });
});
In db.query you can use placeholders $1, $2, … $9, $10, $11, … etc to mark the place where a parameter value should be used. The parameters to replace the placeholders are supplied in the second argument, the array of values. In this case there is only one value (but it must still be put into an array) so we have [custId] as the replacement value for the first placeholder, $1. If there is more than one placeholder there must be the same number of array elements and they must be in the order of the placeholder numbers.
String Placeholders
With String placeholders you don’t put apostrophes around the placeholder:
app.get("/customers/by_city/:city", (req, res) => {
  const cityName = req.params.city;
  db.query("SELECT * FROM customers WHERE city LIKE $1 || '%'", [cityName])
    .then(() => {})
    .catch((err) => {});
});
Use Placeholders to Avoid SQL Injection
What is SQL Injection
If an end user can enter unrestricted text into a data field on a form there is the possibility that they could put a nasty SQL command inside the data. For example, if the field is used to enter the customer name the user could type:J Doe'; delete from customers; select 'x' from customers
as the name value. It looks a bit unlikely but any user with a little bit of SQL knowledge could eventually work out the format needed.
If the code used string concatenation to for the final SQL command it could be something like:
const myQuery = `UPDATE customers SET name = '${inputName}' WHERE id = + ${ID}`;
Then myQuery would become:UPDATE customers SET name = 'J Doe'; DELETE FROM customers; SELECT 'x' FROM customers WHERE id = 123
(Note that semicolon can be used between SQL commands in this context)
By using placeholders instead of string concatenation we can prevent this kind of attack. This is VERY important in web-facing apps that use SQL.
Define and test endpoints (20m)
- Make sure you have defined the endpoints for:
- Getting all customers
- Getting a single customer by id
- Using a method similar to the one used to get a customer by id, define an endpoint that can get customers by matching part of the name (e.g. /customers/by-name/:name).
Remember there may be more than one matching row! - Test all these endpoints with Postman and ensure the results are as expected.
CRUD operations with NodeJS and PostgreSQL
Learning Objectives
👩🏽✈️👨🏾✈️Code along with video mentors
💾 CRUD operations
🌱 Creating data
In the following, we will add a new API endpoint to create a new customer in the table customers of the CYF_hotel database. As a reminder, here is an example of a SQL insert statement to add a new customer:
INSERT INTO customers (name, email, phone, address, city, postcode, country)
  VALUES ('Fred Bloggs', 'fred@bloggs.org', '07123456789', '1 Low Brow',
          'Ashbottom', 'XY2 3ZA', 'UK');
Using body-parser for Form Data
When an endpoint can reasonably expect a large number of data values, for example, when we need to insert a new row into the customers table, then using parameters in the URL is not practical. Instead we can use a ‘middleware’ package such as body-parser, which can extract data from the body of the request.
As we create a new record in the database, we will add a new POST endpoint in the CYF-hotels-api project from last class. Moreover, we need to be able to pass data to this API endpoint such as the name, address, postcode, etcetera, so we can use this API to create different customers. The data can be sent in the body of the request. To access the parameters in the body of the request with Express.JS, we need to add the module body-parser to the CYF-hotels-api project:
At the terminal command line:
npm install --save body-parser
Then include it in the server.js:
const bodyParser = require("body-parser");
app.use(bodyParser.json());
📩 Inserting Rows Using Node.js
We can finally make an endpoint to create a new customer:
app.post("/customers", function (req, res) {
  const newName = req.body.name;
  const newEmail = req.body.email;
  const newPhone = req.body.phone;
  ...
  const newCountry = req.body.country;

  const query =
    `INSERT INTO customers (name, email, phone, address, city, postcode, country)
    VALUES ($1, $2, $3, $4, $5, $6, $7)`;

  db.query(query, [newName, newEmail, ..., newCountry])
    .then(() => {
      res.status(201).send("Created a new customer");
    })
    .catch(err => {
      console.log(err);
    })
});
📮 Using Postman to Test a POST
In Postman:
- Change the method to POST
- Ensure the URL address is your customers endpoint, for example: http://localhost:3000/customers
- Under the address in the Postman window select Body then select raw
- Ensure that JSON is selected at the right hand end
- Enter the data as JSON in the panel below these settings, for example:
{ "name": "Fred Bloggs", "email": "fred@bloggs.org", "phone": "07123456789" }
- Click send
You should see the response “Customer created.”
Exercise 2
- Install body-parser and enable it in your server.js
- Define a new endpoint to create new customer records
For simplicity, only insert the name, phone & email values. Invent your own values. - After successfully inserting the row send back a message, “New customer added.”
- Test your endpoint using Postman
- Check the data has appeared in the table
What Can We Do After an Insert?
- We must start checking for errors in the execution of the SQL. This applies to all commands, not just INSERT.
- If the table has an auto-incrementing primary key we can obtain the value for the new row and return it to the browser. This is often required for subsequent actions in the use case.
- The new data can be logged to the console (although this is not common practice).
- … and so forth …
🧪 Checking for Errors in SQL
The catch block in db.query always has an error parameter. If the passed SQL query throws an error then the callback function passed to the catch method is invoked with an error object generated by node postgres.
A typical situation might be:
  db
    .query(...);
    .then(/* do things for success*/);
    .catch((err) => res.status(500).json({error: err}));
👩🏽🔬 Validating
What could go wrong with our code so far? There is no validation of any user inputs which could result in errors, duplications or inconsistent data in the database! Here are few examples of things we can verify before creating the customer in the database:
- Check that the phone number contains only digits, ‘+’, ‘-’, ‘(’ or ‘)’
- Check that no customer with the same email already exists in the database
- …
Let’s start by validating that phone number the consists of only digits, +, -, (, ) or space and if it doesn’t, return an error. This check uses a regular expression to replace all valid characters with a ‘0’ (zero) symbol then check the result is made up of only ‘0’ symbols.
if (
  newCustPhone.replace(/[+\-()0-9 ]/g, "0") != // replace all valid chars with 0
  "0".padEnd(newCustPhone.length, "0")
) {
  // compare with all zeros same length as phone
  return res
    .status(400)
    .send("The phone number must only contain 0-9, +, -, (, ) or space.");
}
Note: regular expressions may be new to you but they are very powerful and also quite complicated. We don’t have time to teach you the intricacies of “regex” here but you can find numerous resources on the web and in the MDN documentation.
As you have already learned, this validation can also be performed in the browser because it doesn’t involve any database interaction. This is a faster and less costly (in terms of network traffic) approach and should be used where practical. It makes user correction of mistakes quicker and more natural and can be done on a per item basis.
Exercise 3
- Modify your endpoint to check for SQL errors. If an error is encountered then console.log it and return it to the browser.
- Add phone number validation to your endpoint to check that only digits, +, -, (, ) or space are present. Any other characters should send a suitable message back to the browser and abort the insert.
(You may use copy & paste to get the regular expression - it’s not easy to get right by hand.) - Test your endpoint with a variety of data including valid and invalid phone numbers.
📨 Check the Customer’s Email
We can also validate the new customer’s email doesn’t already exist in the database, to prevent duplicate data.
app.post("/customers", function (req, res) {
  const newName = req.body.name;
  const newEmail = req.body.email;
  const newPhone = req.body.phone;
  // et cetera ...

  //
  // Validate the new customer's email address by querying the existing customers table
  // to return any rows that contain the same values
  //
db.query("SELECT 1 FROM customers WHERE email=$1", [newEmail])
  .then((result) => {
    if (result.rowCount > 0) {      // note the use of result.rowCount
      return Promise.reject({error: 'Customer already exists'})
    } else {
      return db.query(`INSERT INTO customers (name, email, phone, address, city, postcode, country)
        VALUES ($1, $2, $3, $4, $5, $6, $7)`, [newName, newEmail, ..., newCountry],
    }
  })
  .then(() => {
    res.status(201).send("Customer created")
  })
  .catch((error) => {
    // any errors or manual rejections will be intercepted here
    // handle error here
  })
Note:
- The
SELECTdoes not choose any column values, just the literal1. We are only interested in the number of rows found (it must be 0 for success). - If a row is found, then a customer with this email exists so we call
Promise.reject: this will then trigger the firstcatchblock in the promise chain where we can handle the error. - If a row is not found, then we perform the insertion query, taking care to return the call to
db.queryso we can access its resolve value in the next.thenblock - This validation is NOT suitable for performing in the browser because it interacts with the database.
Exercise 4
- Before adding a new customer ensure there are none with the same email address in the customers table
- If a duplicate email is found send an appropriate message to the browser
- Use Postman to check that your new code works as expected by trying to insert duplicate emails as well as correct ones
- Check the data has been added to the database (use psql)
🗝️ Return the Primary Key Value for an Insert
If the table uses an auto-incrementing primary key then it is very useful to return the generated value after the INSERT. PostgreSQL provides a very simple mechanism to do this (as do most RDBMS’s) by appending the RETURNING clause to the INSERT, as below:
INSERT INTO customers (name, email, phone)
  VALUES ('Fred Bloggs', 'fred@bloggs.org', '07123456789')
  RETURNING id;
The endpoint now uses the query call shown below:
  db.query(`INSERT INTO customers (name, email, phone, address, city, postcode, country)
    VALUES ($1, $2, $3, $4, $5, $6, $7)
    RETURNING id`, [newName, newEmail, ..., newCountry])
    .then(result => {
        const newId = result.rows[0].id;
        console.log(`New Customer id = ${newId}`);
        res.status(200).json({lastId: newId});
    })
    .catch(err => {
      res.status(500).json({error: err});
    })
Exercise 5
- Further extend your
POSTendpoint so that it returns the new customer id value to the browser. - Use Postman to check that the new value is returned.
🆕 Updating data
We can now implement an endpoint to update a customer record in the database. For this, we will use a PUT endpoint.
app.put("/customers/:id", function (req, res) {
  const custId = req.params.id;
  const newEmail = req.body.email;
  const newPhone = req.body.phone;

  db.query("UPDATE customers SET email=$2, phone = $3 WHERE id=$1", [
    custId,
    newEmail,
    newPhone,
  ])
    .then(() => res.send(`Customer ${customerId} updated!`))
    .catch((err) => {
      console.error(err);
      res.status(500).json({ error: err });
    });
});
Note:
- This endpoint uses both a URL parameter (
:id) to supply the customer id and data in the request body to provide the updated column values. - The order of the placeholders does not have to correspond to their sequence in the SQL. In this case we’ve put the
custIdvalue first but it appears last in the SQL (in theWHEREclause).
We used URL parameters to query for a specific customer earlier and we used body data to insert a new customer.
What can go wrong in the code above? Again, there is no validation! The user could try to set an empty email or even a string which is not following the format of an email. Remember, validating data is very important to make sure you don’t end up with inconsistent data in your database!
Exercise 6
- Create a new endpoint to update reservations to provide the room number allocated to the guest when they check in. Use the reservation id value to identify the row.
- Use Postman to check that the endpoint works correctly and the row is updated.
🗑️ Deleting data
To delete a record from the database, we will use a DELETE endpoint:
app.delete("/customers/:id", function (req, res) {
  const custId = req.params.id;

  db.query("DELETE FROM customers WHERE id=$1", [custId])
    .then(() => res.send(`Customer ${custId} deleted!`))
    .catch((err) => console.error(err));
});
However, if you try to delete a customer which already has some bookings, the previous endpoint will fail. Do you know why? You cannot delete a customer whose ID is used as a foreign key in another table (in this case, in the reservations table). Let’s delete all the customer bookings first:
app.delete("/customers/:customerId", function (req, res) {
  const customerId = req.params.customerId;

  db.query("DELETE FROM reservations WHERE cust_id=$1", [customerId])
    .then(() => {
      return db.query("DELETE FROM customers WHERE id=$1", [customerId]);
    })
    .then(() => res.send(`Customer ${customerId} deleted!`))
    .catch((e) => console.error(e));
});
Exercise 7
- Add an endpoint to delete from the reservations table using the value of the id to choose the row to be removed. Only allow deletion of reservations with future checking dates otherwise return an error.
- Check the endpoint works correctly using Postman (use psql to verify the row has been deleted).
⚠️ Warning!
Update & Delete are not Safe
Optimistic Locking
The solution is known as “optimistic locking” but we just don’t have time in this course to cover it. So long as you are aware of the problem you can use the approach but add plenty of comments to make clear that the code is not yet safe.
Note also that optimistic locking requires changes not only to the code of your Node endpoints but also to the behaviour of the web pages that use and modify the data.
Prep Job Hunting and Mock Interview
🤙🏽 FeedbackLearning Objectives
Introduction
Questions asked during a competency-based interview aim to test a variety of skills, and you’ll need to answer questions in the context of actual events. The skills tested will depend mainly on the job you’re interviewing for and the sector you’ll be working in.
Expect questions opening with ‘Tell us about a time when you…’, ‘Give an example of…’ or ‘Describe how you…’.
Preparing for competency-based interviews
🎯 Goal: To prepare for competency-based interviews. (90 minutes)
- Read and complete the recommended exercises in this guide: The Ultimate Guide to Competency-Based Interviews as a Software Engineer.
- Create a spreadsheet for each of the two templates described in the article. For the first template, write about at least one project. For the second template, write at least one answer to each question.
Read this job description
🎯 Goal: Read the following job description thoroughly as you’ll need it in class (30 minutes)
Read this job description:
TechComp is redefining the future of collaboration in the workspace. We are creating a world where people come together effortlessly and enjoyably. Our technology powers products and services that bring modern, uncompromised collaboration to everyone – spanning every room, desk, pocket, and application. Industry-leading products like TechComp Teams, TechComp Meetings, TechComp Meeting Server, and TechComp Collaboration Meeting Rooms are examples of our technology in action.
What you’ll do
- You’ll be part of a cross-functional team to build and improve TechComp’s next-generation meeting management web application.
- You’ll work in an Agile, collaborative environment to capture requirements, propose software designs, follow through with implementation, and iterate in response to feedback.
- You’ll employ TechComp’s Design Thinking to create delightful products for our users.
- You’ll work across the entire stack, from the backend to the front end and all in between.
- You’ll create everything from mockups and UI components to the business logic and data structures.
- You’ll ensure the software is delivered to the highest quality through code reviews, writing of unit and integration tests, and working closely with Test Engineers.
Who you are
- You have a technical degree or equivalent experience with a strong foundation in computer science fundamentals.
- You have a proven track record of personal and academic achievements.
- You are highly motivated and have a passion for creating awesome products.
- You are a flexible individual who can quickly adapt to new challenges and requirements.
- You thrive on collaboration, working side by side with people from diverse backgrounds and disciplines.
- You are a strong communicator, both written and verbal.
- You can apply a scientific approach to solving complex problems.
- You are motivated by challenges and continuous learning.
Required Skills:
- You are familiar with programming languages and web frameworks like Python, Django and JavaScript.
- You know application and web development in HTML and CSS.
- You have an understanding of, or experience with, Agile software development methodologies.
Why TechComp?
At TechComp, each person brings their unique talents to work as a team and make a difference. Yes, our technology changes the way the world works, lives, plays. and learns, but our edge comes from our people.
We connect everything – people, processes, data, and things – and we use those connections to change our world for the better.
We innovate everywhere – from launching a new era of networking that adapts, learns, and protects, to building TechComp Services that accelerate businesses and business results. Our technology powers entertainment, retail, healthcare, education, and more – from Smart Cities to your everyday devices.
We benefit everyone – we do all of this while striving for a culture that empowers every person to be the difference, at work and in our communities.
Colourful hair? Don’t care. Tattoos? Show off your ink. Like polka dots? That’s cool. Pop culture geek? Many of us are. Be you, with us! #WeAreTechComp
P.S.: Try to identify key elements in the job description and think about how you can highlight your relevant skills and experiences in your CV. Remember to bring your printed CV to the class.
Source: Junior Software Engineer (Media) Job in Hanworth (adzuna.co.uk)
Write a resume summary
🎯 Goal: To write a resume summary (30 minutes)
Write a resume summary:
- Review your general CV and start tailoring it to the needs of the job description from the previous exercise - focus only on the summary.
- It’s at the top of your resume, so it is one of the first things a hiring manager sees. Use it to showcase your most relevant skills and accomplishments based on the keywords you highlighted.
- Include the job title to which you are applying, proving that this is a personalised CV.