Do the Prep
You should have completed the prep and backlog tasks listed in the Onboarding module. If you haven’t done them yet, go back and complete them now.
🧠 You must always do the prep.
If you have worked through the Onboarding prep, begin the prep for the first JavaScript Fundamentals sprint (which starts here!).
💬 No, the prep will show you HOW to complete the backlog, so do it first
💬 Nope, you’re being told right now
💬 Yes, you should always start with the prep
Inspecting a commit
Learning Objectives
Recall that a commit is a snapshot of our project at some point in time.
Therefore, we should be able to check out a previous version of our project and look at the files and folders there. We can use the Github interface to check out the files and folders at a previous commit.
✍️Exercise - Explore a Commit
Go back to this page https://github.com/CodeYourFuture/education-blog/commits/main
Locate the the commit with hash 4e78b32 and then look for the <> icon that says “Browse the repository at this point in the history” when hovered over with your mouse.
Click this icon to explore the code at this point in the history. What differences do you notice?
Do the same but for the commit cd981a0.
Inspecting previous versions
Learning Objectives
We can view the different commits of a project on Github. This means we can see what an application looked like before, in previous versions.
✍️Exercise - Comparing Previous Versions
Here are some different versions of the educational blog we introduced in the previous module.
Deployed version A educational blog
Deployed version B educational blog
Deployed version C educational blog
Questions
- What is the difference between Version A and Version B on the index page (the page you first land on after clicking on the link)
- What is the difference between Version C and the main version of the site.
- Which commit from the education-blog repo corresponds to Version C? Remember to check the git history.
- Which commit from the education-blog repo corresponds to Version A?
Forking a repository
Learning Objectives
Often we want to take an existing project and start working on it independently. In other words: we start making our own versions of the project separate from the original project.
We can create a fork. A fork is a copy of a repository that exists on Github.
A GitHub repository’s url looks like this:
https://github.com/CodeYourFuture/cyf-demo-repoLike any url it is made up of different parts.
When the user EagerLearner forks this repo, the path changes from CodeYourFuture to EagerLearner.
✍️Exercise - Fork a Repo
- Go to https://github.com/CodeYourFuture/education-blog.
- Find the Fork button on this page.
- Click on the Fork button to create a new fork of the repository and set yourself as the owner of the fork.
📋 How can you check you successfully forked the original repository?
Hint: Check the URL of your forked repository
Working locally
Learning Objectives
Before we can work on it we need to get a local copy of the education blog repo. A repository on GitHub is said to be remote and a repository on our own computer is said to be local.
We call a local copy of a GitHub repository a clone. The process of copying a remote repository on to a local machine is called cloning.
GitHub is an really useful tool for aiding collaboration, but when it comes to writing and updating the code for a project we tend to want the flexibility that comes with working on our computer. So we need to address the following question:
How can we get a copy of an existing GitHub repository on our local machine?
In other words, we need to get a local copy of the repository which is on GitHub.
Watch the video below to see instructions on one of the ways you can clone a repo: using the Visual Studio Code interface.
✍️Exercise: Clone a repo
Follow the steps in the above video to make a local copy of the education blog repo that you forked in the previous step.
Reminders:
- The “Clone Repository” button won’t be visible if you are already working in another repository. If you are already working in a repo you can close it by selecting
File --> Close Folder - Use the URL for your fork of the
education-blogrepo when you are cloning, not the URL for the original CYF repo - When selecting the location to clone your files, choose the
CYFfolder you created in an earlier task
For a visual reference, here is a diagram representing how the repositories interact after forking and cloning:
Sketch this diagram in your notebook. If you get confused about where your changes are you can refer back to this diagram to help you understand what’s happening.
Viewing files from a git clone
Learning Objectives
Once you’ve got a local copy of a codebase on your local machine you can start to view the files and folders in that codebase using VSCode.
✍️Exercise - Explore a repo using VSCode
Figure out how to open the cloned repository on your local machine in VSCode.
Explore the repository in VSCode and use the code editor to look at the various files and folders.
Use the Source Control tab to view the commit history and explore file changes.
If you get stuck on any of these exercises, it’s a good idea to search online. For example, you could Google “viewing commit in vscode”
Branching
Learning Objectives
We can check the commits on the remote repository as before:
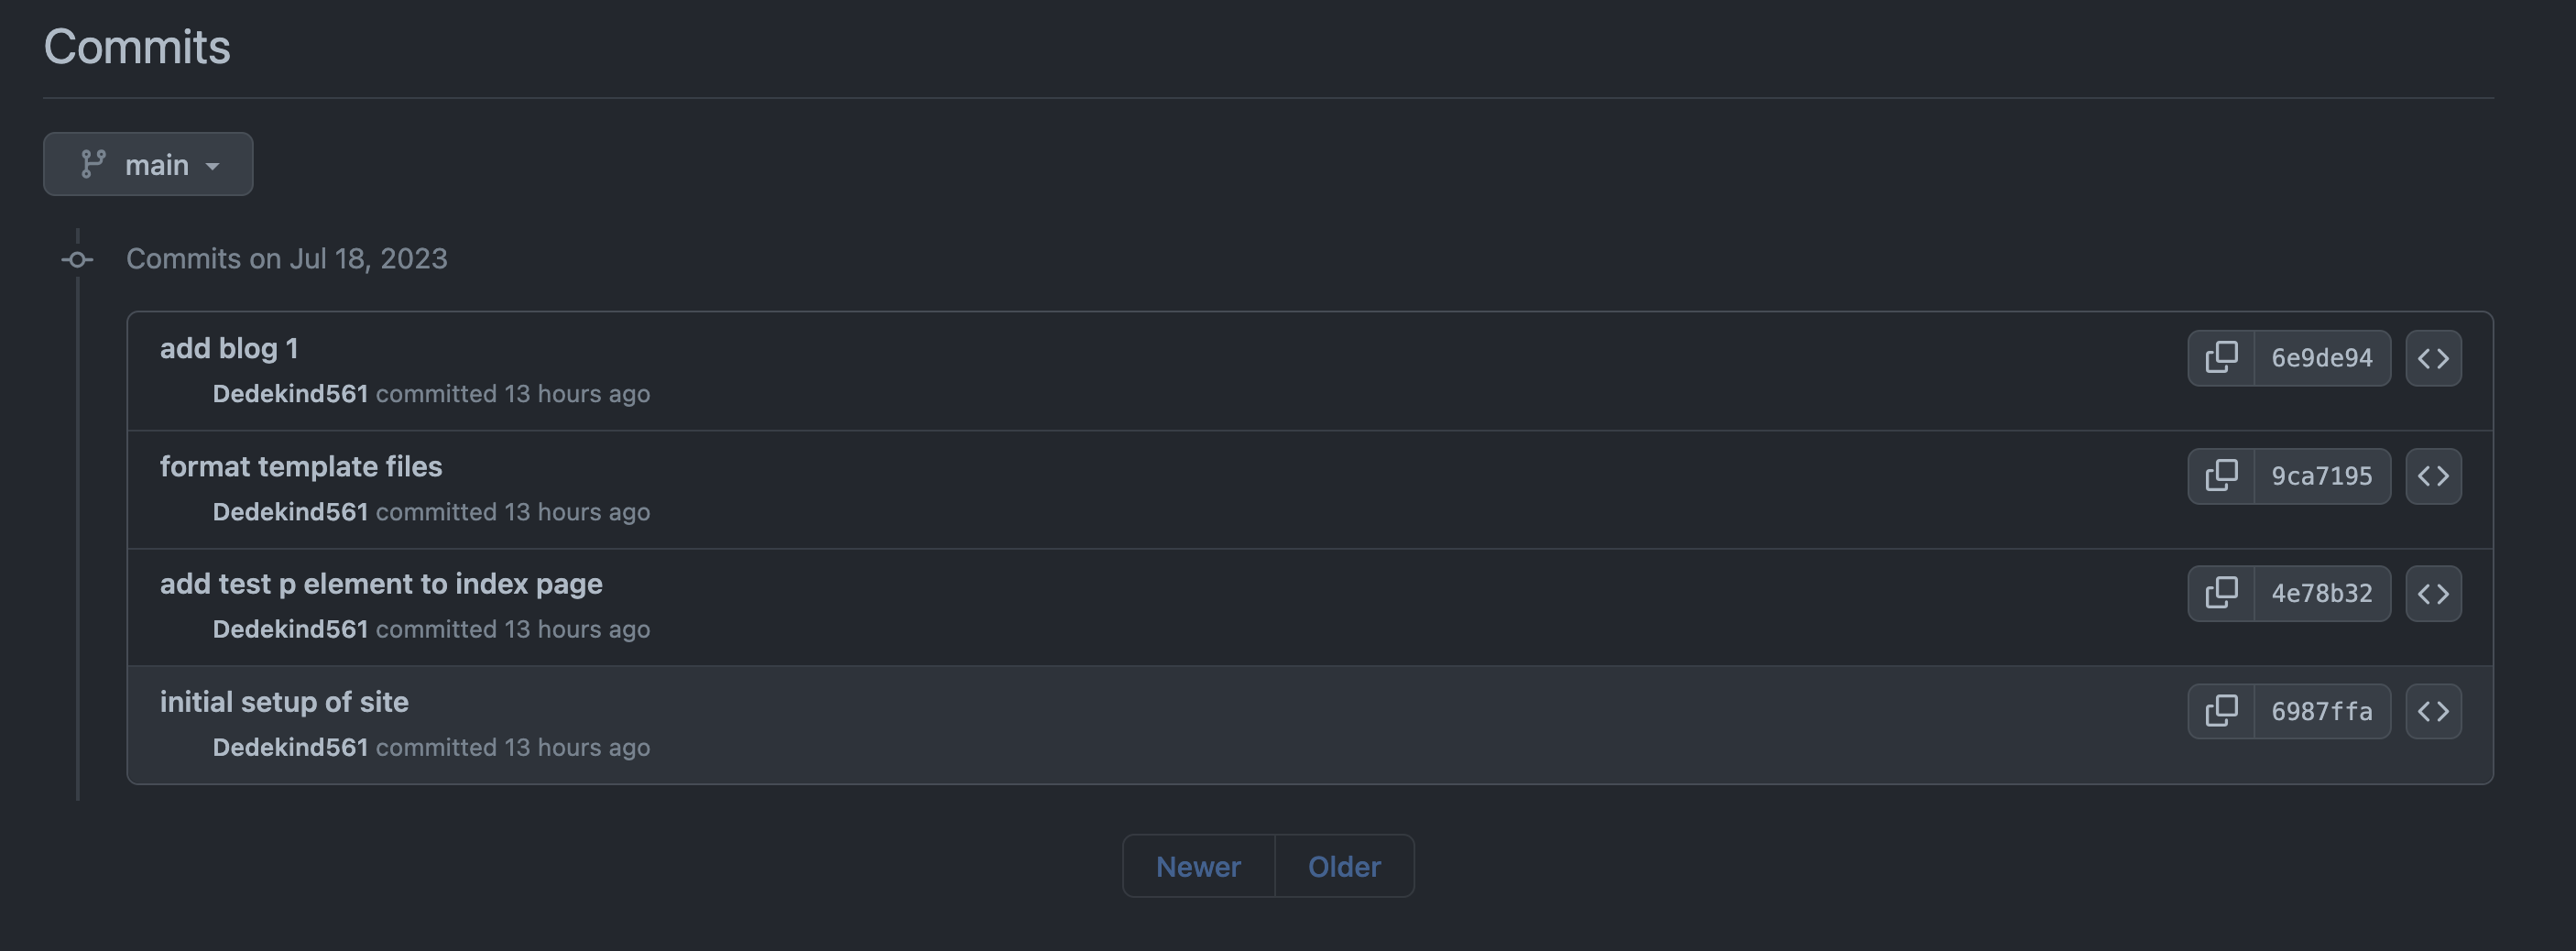
When you check the history today your view will be slightly different. The commits in the screenshot will still be there, but there will be newer commits too.
On the left page of the page, we see additional information:
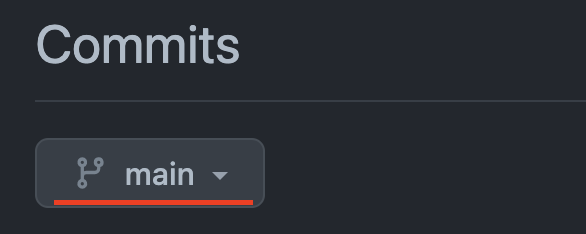
So what is main?
main is a branch.
Commits form a sequence that look like this:
A branch represents a particular history of development in a project - the different versions there have been.
📖Definition: Branch
There can be different branches with different names, which may have different versions.
For example, if we were testing out some different visual styles, maybe we would have one branch with some extra changes which make the website more blue, and a different branch with some extra changes which make the website more purple. These branches may share some commits in history, but have some extra different commits separately.
The main branch is often treated as a special branch - it’s where we put commits which people working on the project have agreed on. Other branches (e.g. the try-purple branch) may have extra changes that have not been agreed on. If people working on the project agree the changes from the purple branch are good, we’ll add those changes to the main branch.
When we’re working on something new, we haven’t agreed with other people that our new thing is good yet, so we often don’t add our changes to the main branch straight away. Instead we make our own branch to experiment on.
We can start to create independent branches like this:
In the diagram above, we can continue to commit on the “week-1-coursework” branch without altering the history of the main branch.
✍️Exercise: Creating a local branch
Open the
education-blogrepository in VSCode.Using this clip, create a new branch called
update-blog-1in your local repository.
📋 How can you check that you’ve successfully created a branch?
Merging
Learning Objectives
If you have successfully created a new branch you will see that it is now displayed instead of main in the bottom left of the VSCode window:
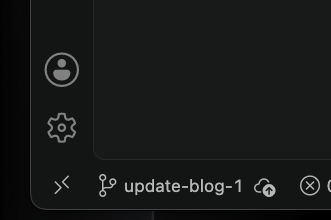
It’s time to make some changes!
✍️Exercise: Updating the blog
- Add an
h2heading to the blog with the title “Tips” - Commit your change
- Add an unordered list with three tips for getting un-stuck. Try Google if you need some ideas!
- Make another commit with your list
Remember: This is a markdown file so your heading and list will need to use markdown syntax. This cheat sheet will help if you get stuck.
Now we have made changes we can check our Git history and see the commits listed there. Something is different this time, though:
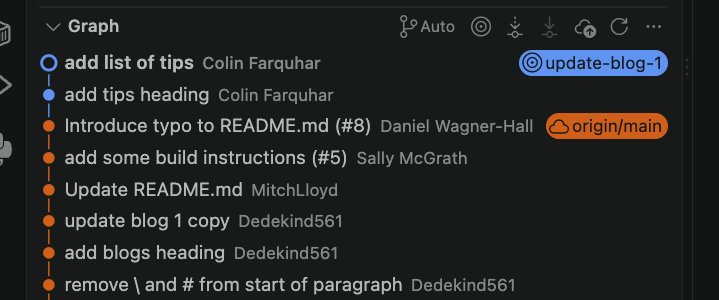
The commits we made on the branch are a different colour to those on main (your colours may not be the same as mine). This can be really helpful when we are tracking changes through a project.
We need our work to be on GitHub to share with our colleagues. We can push a branch in the same way as we push to main by clicking the “publish branch” button.
Branches on GitHub
When we look at the repository on GitHub we can see something has changed here too. It now says we have two branches and clicking on the branch name opens a drop-down listing all the branches which have been pushed. For now it’s just our update-blog-1 branch.
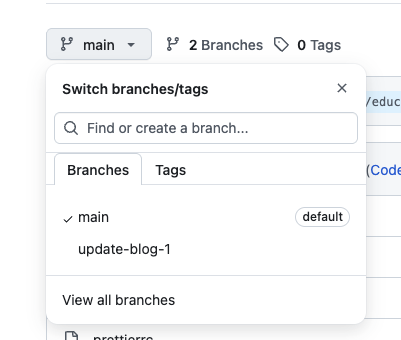
Click update-blog-1 in the list and the UI will update to show our files as they are on the branch.
✍️Exercise: Find your changes
We also see a summary of the difference between our branch and main at the top of the page:

When we see a message like this saying our branch is “N commits ahead” it means there is work on our branch which isn’t available on main. We need to merge our work with the rest of the project.
Creating a pull request
When we merge our work we will combine our commits with those on the branch we are merging to. In this example we will take commits from update-blog-1 and merge them onto main.
GitHub has tools which will help us manage this process. We’re going to create a pull request and see how it will help us.
Click the “Pull requests” tab then the green “New pull request” button. The next page will say there is nothing to compare, but that’s because by default it won’t be looking at our changes. Instead it will try to compare the main branch of our fork with the main branch of the original repository and neither of them have changed.
Click the left drop-down and select your fork of the repository.
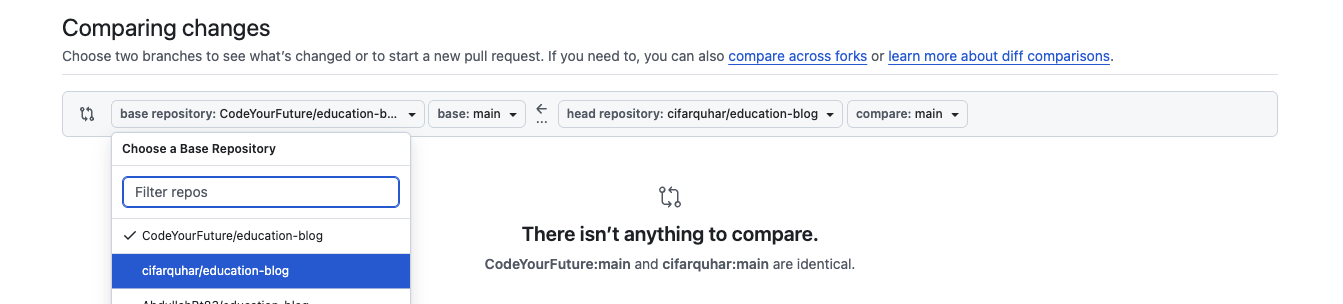
❗Submitting work will be different
You will skip this step when submitting work from your backlog. Unless the instruction say otherwise you will always set the base of your pull request to be the CYF repo you created the fork from.
We are doing things differently here to demonstrate the complete merging process. If everyone tried to merge the same changes to the original repository it would cause problems.
The UI still tells us there are still no changes to compare. Let’s fix that by selecting a branch to compare. In the right-hand drop-down select your update-blog-1 branch and the UI will change:
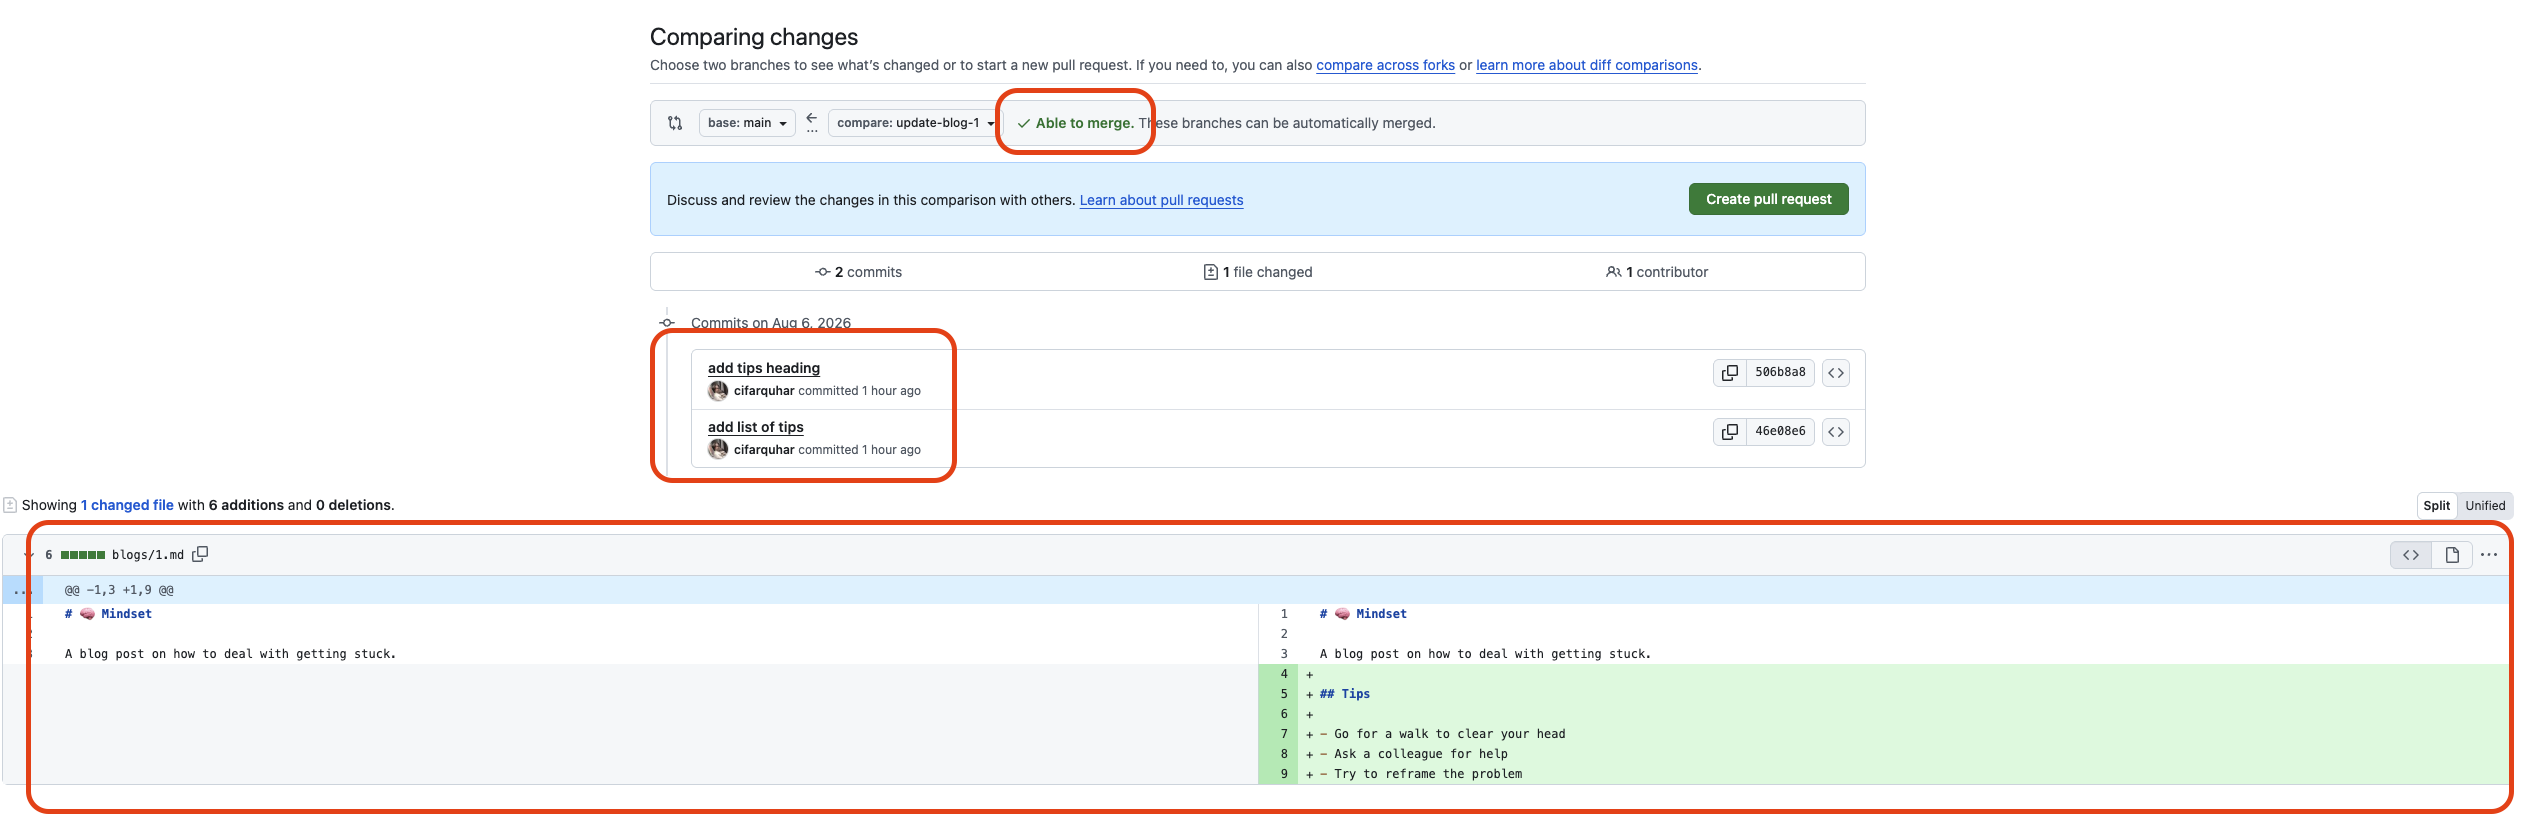
There are a couple of things to note here:
- GitHub tells us it is able to merge automatically. This won’t always be the case, but we’ll look at how to handle that in a later workshop.
- We can see a list of all the commits we are about to merge
- We see a display of all the changes which will be made to the files. We are only adding content here so everything is highlighted green. If we were deleting lines they would be highlighted in red.
Click the “create pull request” button to move to the next stage. Here we can give our pull request a title and a description. Every organisation has it’s own way of structuring these and CYF is no different. You can find instructions for how to title a pull request in the guides section.
For now we’ll leave the defaults in place since this is just a practice pull request. Click the green button to finish creating it.
Merging
Now we have created a pull request and we’re ready to merge our work. In a typical professional workflow you would ask a senior colleague to review your work before merging. We will follow a similar process with the work you submit for CYF: a volunteer will review your pull requests and give you feedback on your code.
In a future workshop we will spend more time exploring the interface but for now we’ll concentrate on the box in the middle of the page:
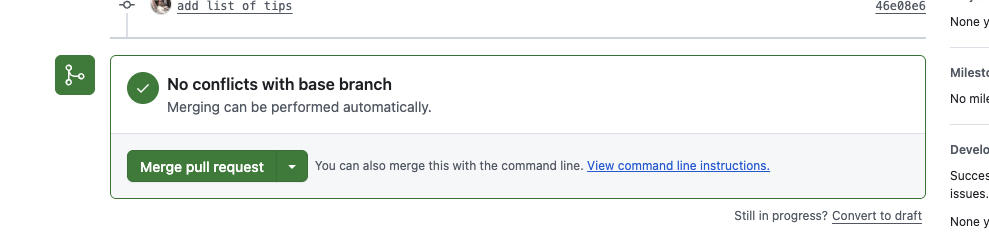
Clicking the green button will open a form asking for a commit message. Typically we can leave this as the default value. When we finalise the merge a new commit will be created on main, just like for any other change we make to the code. Click “confirm merge” to complete the process.
📖Definition: Merge conflicts
The prompt told us there were “no conflicts with the base branch”. We won’t always be able to merge our work so easily, sometimes another engineer will have made changes to the same files as us. When this happens Git isn’t able to figure out which change takes priority and a merge conflict occurs.
You shouldn’t come across this while submitting work. If you do post a message on Slack and get help to resolve it. We will look at merge conflicts in detail in a future workshop.
Navigate back to the “code” tab in GitHub and make sure you are viewing the main branch. Take a moment to explore the files - our changes are now on main!
Now it’s time to put our new skills to work!
Setting Up Your Planner
Learning Objectives
As you work through the course there will be a lot of tasks for you to complete. Some will involve writing code, others will involve research or other activities. It’s very important to keep track of your to-do list, otherwise you will find it challenging to get everything done. In this section we will use GitHub’s built-in project tools to get started.
Setting up a project
1. Creating a repository
GitHub’s projects work by tracking individual items called issues. Each issue represents something on our to-do list and we can prioritise them, add labels to them and even link them to other related issues. We will look at issues in more depth in a workshop at the end of this sprint.
Any issue we create needs to be associated with a repository. If we were creating a product we would use the repository containing our code, but this time we will create an empty repository just to handle our issues.
✍️Exercise: Create a repository
coursework-planner.2. Creating the project
Once we have a repository to work with we can create our project. From the repository page look at the top tool bar and click the Projects button.
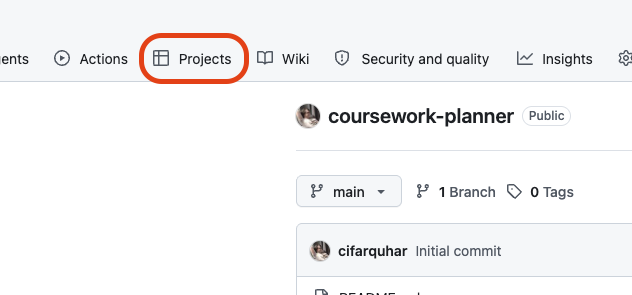
The next screen shows all the projects associated with this repository, but for now it just tells us we don’t have any yet. Click one of the green “new project” buttons to continue. This will give us a number of templates to choose from. Select the “Kanban” option.
A Kanban board is a visual representation of a project’s progress. It splits tasks into lists of things which are still to be done, things which are in progress and things which are complete.
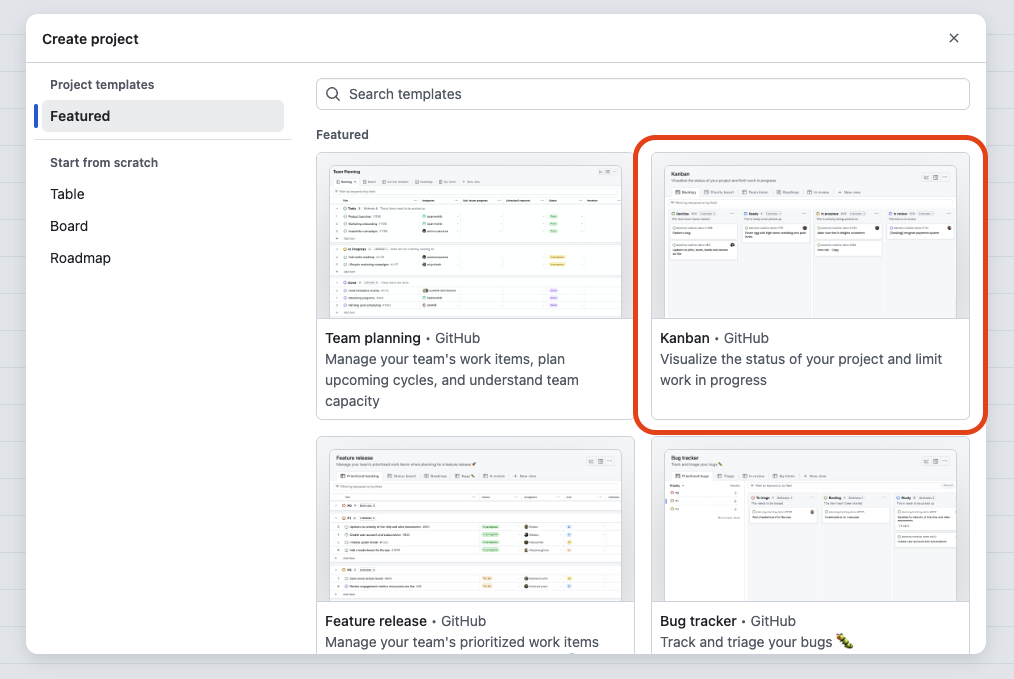
On the next screen we will provide the details of our project:
- In the
Project namefield replace the default with “Coursework Planner” - Check the
import items from repositorybox is ticked and theRepositorydropdown has the repo you just created selected. This should have happened by default, but it never hurts to check
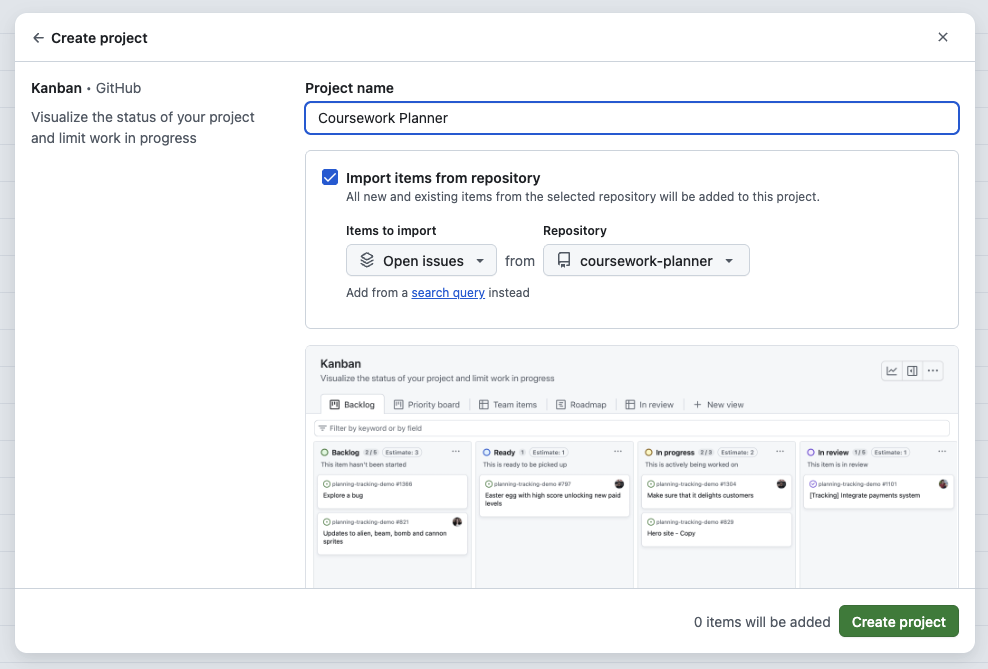
Click the green button to create your project.
3. Finishing setup
We’re almost ready to start adding tasks but we need to clear up some things first. We don’t need the Ready column so let’s delete it. Click the three dots next to the column name, then click “Delete”.
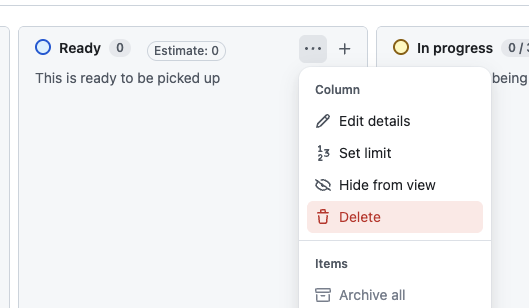
By default GitHub puts a limit on how many items we can have on a list, but we don’t want that. Find the Backlog column and click the three dots again. This time click “Set limit” and then “Remove limit” in the popup which appears.
This is your planner and it’s up to you to keep it up to date! The defaults are sensible options for our needs but you can customise it any way you want.
✍️Exercise: Customise your planner
- The
In ProgressandIn Reviewcolumns both have limits on how many tickets they can have. Remove them in the same way as you did forBacklog. - Explore the “Edit details” menu item and see what you can change. Try changing the colour of one of the columns.
4. Creating an issue
📝Note
Mostly, your coursework planner is a tool for you. You can choose how you want to use it. Each sprint, we suggest adding one item for each backlog item you have, so you can keep a to do list, and keep track of the status of everything you have to do.
Over time, you may decide you want to use it differently. Maybe you just want to track each week’s work as a single item. Or break bigger tasks down into multiple items. That’s up to you.
Sometimes your backlog items will ask you to create a specific item on your coursework planner and link to it.
It’s time to practice adding something to our backlog. Hover your cursor over the Backlog column and you will see an “add item” button appear. Click it and a text field will appear at the bottom of the page.
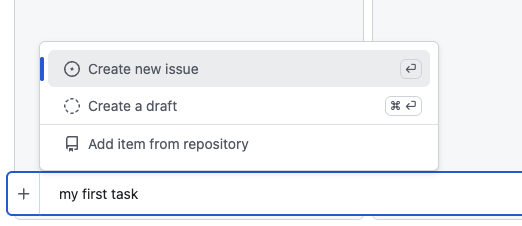
Type “my first task” in the text field and take a look at the popup which appears. Ensure “create new issue” is selected and press the enter key, or click the plus sign next to the text field.
Now we can add details of the task. The screenshot below shows an example, but when you add something to your planner you should include all the relevant details from the backlog ticket.
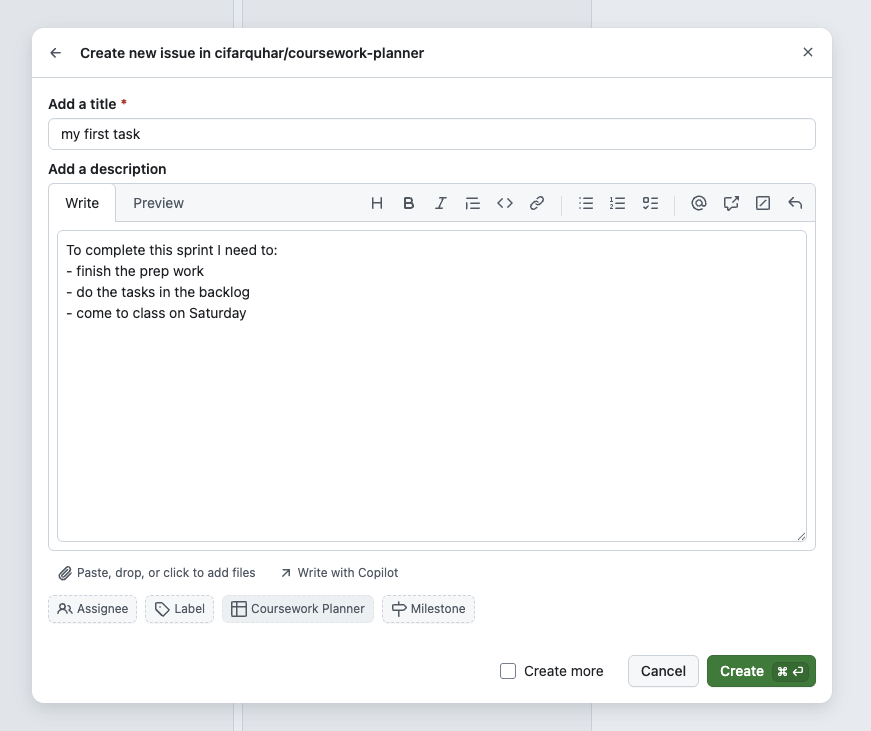
Once you have finished adding the relevant information you can click the “Create” button to add the issue to your backlog. Now you can click and drag it between columns as you work on it.
When you’re asked to add something to your coursework planner, read the instructions carefully! Some backlog items will ask you to give an issue a specific title, or to include specific information
What are forms?
Learning Objectives
Watch this video about HTML forms:
After you’ve watched this video, consider the following questions. Try to answer them yourself. After you’ve answered each question for yourself, expand others’ answers which have been compiled from other trainees and volunteers.
10 Things About Forms
So let's go deep on forms. What is a form? What does form mean?
🧑🏿💻💬 Trainee: What does form mean? It’s like a set of options for a user to choose from on a website.
👩🏻💻💬 Mentor: Yes, that is true, that is a correct answer. A deeper answer might be form means shape. It’s how we define the shape of data. So, imagine a shape sorter. You put a square thing in the square hole; you put a round thing in the round hole. Each form field is a different shape in the shape sorter lid. That’s what we’re doing when we write forms. We are forming data with fields.
Why do we do that? Why do we bother grouping and shaping data in that way?
🧑🏿💻💬 Trainee: Of course because it makes it easier to sort it out.
👩🏻💻💬 Mentor: Yeah, absolutely! Because you know we’re going to post that data to a database. Our database doesn’t know what all these strings mean. We have to define the data. We have to label the data. We have to group it, and we have to do something with it: to post it to a database or in some cases, get it from a database.
So that’s the point of all this.
What does field mean?
👩💻💬 Trainee: Field? It means like the window is completed with some information. A piece of data.
👩🏻💻💬 Mentor: Right! You put a piece into a form field; you just put one thing in there. A form has many fields, and a field is a single piece of data. It is the smallest piece.
So we structure data with forms. And we do that by defining form fields with semantic HTML.
📝Now practise with
What else do we structure, when we write an HTML form?
🧑🏻💻💬 Trainee: Gathering data you mean? I’d be doing a search…
🧑🏿💻💬 Trainee: Can I say? We can structure… an action, a connection.
👩🏻💻💬 Mentor: Ooh, that’s a great answer. We can structure interaction. We tell the user, what to put in the form field, and how to put that data in. We structure a really specific kind of interaction. We guide them and tell them what to do. And the way that we structure those interactions is, again, using form fields. Using HTML form elements, attributes, and values.
That’s really important to think about, because when you’re deciding what to write in a form, you need to start with ‘what data do I need.’ It’s better to do that than to try and memorise all the different types of form fields. If you think:
Then look up that last part. That’s more effective than trying to memorise all the different types of form fields.
But saying that, let's name some form fields now -- some elements in HTML that we can use to structure data. I'm going to say, input of type text. Name a bunch more.
🧑🏿💻💬 Trainee: Yeah, maybe checkbox?
👩🏼💻💬 Trainee: radio button.
👨🏿💻💬 Trainee: submit input type, could be submit or button itself.
👩🏽💻💬 Trainee: autocomplete?
👨🏻💻💬 Trainee: I think autocomplete is an attribute, but it’s not itself an element or element type? How about textarea ?
🧑🏿💻💬 Trainee: select and option
👨💻💬 Trainee: The input of type password…
👩🏻💻💬 Mentor: The point being that there are absolutely loads of different form elements!
What you need to focus on is what you’re actually doing. We’re structuring data: you are defining, naming and then grouping data. Keep that goal front and center, then your forms will work well.
📝Now practise with
Oh and... what does input mean?
🧑🏿💻💬 Trainee: Input means to put something in. In this case the data we put in the form.
👩🏻💻💬 Mentor: Bang on.
What happens when things don't work well. What happens when the user puts the wrong thing in a field?
🧑🏿💻💬 Trainee: Do you mean validation? Don’t we need JavaScript for that?
🧑🏾💻💬 Mentor: We’ll learn about validation with JavaScript later on, but there’s actually a lot of validation built in to HTML. For example, if you put a required attribute on a field, the browser will not let you submit the form until you fill in that field. That’s validation: it checks against rules and rejects the data if it doesn’t meet the rules.
🧑🏿💻💬 Trainee: But then aren't all form elements validation?
🧑🏽💻💬 Mentor: You could say that all the rules you make about what the user can put in a field are also validation. Every type we just named - input type checkbox, input type email, number, date… are rules about data.
I think the difference is that there’s no way to type into a checkbox: there’s no error message, you just can’t do it. If you type your birthday into an email field, the browser will tell you that’s not a valid email address. So one is just impossible to do and the other gives you an error message, and that’s normally what we mean by validation.
Why is it important to validate data?
👨🏻💻💬 Trainee: Because if you don’t validate it, you might not be able to use it?
🧑🏾💻💬 Mentor: Right. Forms go wrong when you are vague. You must enforce input with validation, because if users can get it wrong, they will.
What will happen if you put a type of text on an input you label with email?
👨🏾💻💬 Trainee: Oh well then people will write in things that aren’t email addresses?
🧑🏿💻💬 Trainee: And you won’t know until you try to send them an email…
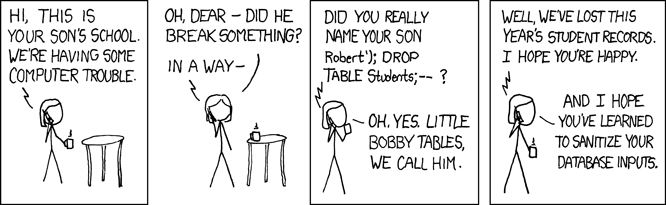
👩🏻💻💬 Mentor: Yeah they will. You can be absolutely guaranteed that users will do that. You have to save them from themselves, and save your database from your users!
📝Now practise with
Backlog
Learning Objectives
In software development, we break down complex projects into smaller, manageable parts, which we work on for a week or two. These periods are called “sprints.”
A sprint backlog is like a to-do list. It lists what the team has decided to work on this sprint. It’s chosen from a larger list, usually called the “product backlog,” which holds the entire project to-do list.
In this course, the backlog is a set of work designed to build understanding beyond the concepts introduced in the course prep. For your course, we have prepared a backlog of mandatory work for each sprint. You will copy these tasks into your own backlog. You can also add any other tickets you want to work on to your backlog, and schedule all of the tasks according to your own goals and capacity. Use your planning board to do this.
You will find the backlog in the Backlog view on every sprint.
Copy the tickets you are working on to your own backlog. Organise your tickets on your board and move them to the right column as you work through them. Here’s a flowchart showing the stages a ticket goes through:
🕹️Backlog (30 minutes)
- Find the sprint backlog
- Copy your tickets to your own backlog
- Organise your tickets on your board